Friday, November 30, 2012

BEDROOM IDEAS: COLOR, STYLE AND DESIGN


Looking to decorate your bedroom? Here you will find some gorgeous, stylish bedroom design ideas which are in different styles and colors.

I hope these pictures inspire you before you make a decision.


Which one would you choose? ;)

EXTREME EYELINER: Amy Winehouse' Winged Eyeliner


Winged Eyeliner of Amy Winehouse


Amy Winehouse (R.I.P.) had a pin-up make-up style: Lots of black and red... and a winged eyeliner.


A bold red pout competes with the eye. The result is done up and dramatic.

The Amy Winehouse "winged" eyeliner has inspired a thousand magazine covers. Karl Lagerfeld once described Amy Winehouse as a style icon. Indeed her vintage-inspired dress sense, beehived hair and winged eyeliner were certainly replicated worldwide by adoring fans, designers, stylists, makeup artists and fashionistas alike.


A Style Icon


Amy made her bold beehive hairdo and exaggerated winged eyeliner her trademark style and a whole generation of young girls followed suit. All the Amy Winehouse essentials - amazingly big hair, winged eyeliner & a bit of retro.


And here is how to wing your eyeliner:


What you will need:

- A liquid eyeliner

 
- Or a gel eyeliner and an eyeliner brush


-Or a liquid pen


So, now a bit of a demonstration. I'm sure there are many other ways to achieve this but this is just my technique. Don't try to do the whole thing all in one sweep without lifting your brush as you'll lose all precision. I break it down into three steps which I've shown below:


Step 1. Draw a thin line close to your eyelashes. Don't worry about any wing just yet. This line also doesn't need to be overly neat as we'll be going over it again later anyway. It's really important to tilt your head backwards when doing liner because you need your eyelid to be as flat and smooth as possible so that you get a nice fluid line.

Step 2. Draw in the outer line of your wing. This should generally angle upwards in the same direction as your lower lash line. Just imagine that your lower lash line is continuing on upwards. If you have a hooded eye, however, you may need to angle your liner slightly more outwards in order to avoid the hooded area. The length of your wing is down to personal preference. If you want a dramatic liner make the wing longer and make it shorter for a more subtle one.
Step 3. Now you need to connect the wing back to the line along your eyelashes. I've mapped it out here in red. Don't start at the very tip of  your wing. Leave the very top of it alone as that part should be left extremely fine. Now connect the wing back down along your eye, gradually making it thinner as you reach the inner corner of your eye. So it should be thicker on the outer part of your eye and thinner towards the inner corner.


That's it! If you need to go over it again to fix any lumps or bumps or to thicken it then you can. Now you just need to line your waterline if you want to and apply your mascara and you're done!


GOLDEN TIPS

-Always start from the inside and stroke outward in one fell swoop. Don’t try to do it in portions, just go for it–it’s silly, but it’s all about believing in yourself.
-When you get to the end of the lashes, go slightly upward. Remember, the more drama you want, the more distinct the angle should be.
- If you mess up at the end, don’t fret, just use a cue tip or tissue with a bit of gentle lotion or makeup remover to remove the wing. Then just try again. If the whole line is a mess, wipe it all off and start all over.

Amy's eyeliner is a a bit more exaggerated... When you look at the pictures, you will see that amy's eyeliner covers almost all of her eyelids then angles up as it's going outward. 


In this picture she is using RIMMEL Exaggerate eyeliner:


Rimmel Exaggerate Eyeliner


Saturday, November 10, 2012

Long Wavy Hairstyles: Have Them Naturally


Best How To Get Long Wavy Hairstyles


How to Have Long Wavy Hair:

1. The first step for any hair type is ensure that you are taking care of your hair in order for it to grow long and get that healthy sheen. A proper, balanced diet is essential, along with a good intake of omega-3 fatty acids (think salmon and nuts). Make sure you are conditioning your hair as well (I prefer natural products). You can help improve its sheen by applying homemade ingredients like egg yolks, olive oil or almond oil.

2. Growing your hair long takes patience and still requires regular cuts to trim off dead ends. Stay healthy, and practice the following wave-creating hair tips on hair of any length while you wait for it to grow. If you already have long hair...enjoy it and take care of it.

3.If you have dead straight, fine hair you are probably going to need to break out the curling iron to fake those wavy locks. First, apply some light gel or mousse so your hair will hold the curl. If your hair is thin and fine, don't use too much or it will weigh your hair down.

4. The best way to obtain a natural wave is to hold the barrel vertically while keeping the clamp closed and begin wrapping a section of hair around the outside of the barrel (not clamped inside). You can start at the top by the root or midway down- just be sure to wrap hair all the way to the end. 

5. Curl your entire head, section by section. It also helps to pin up your top layer of hair and curl the bottom layer underneath first. This adds more volume to your hair. I like to curl the hair sections that frame my face by wrapping in the direction AWAY from my face. This gives you that somewhat feathered (but not too 70's look). Finish off with a spritz of hair spray.

6.  If your hair takes kindly to a little wave on its own, you may not need a curling iron. One trick I use is to twist damp hair into tight little buns and pin them to my head while the hair dries. Depending on how much hair you have, you may only need one or two buns on each side of your head (I like to do the bangs/face framing layer separately). Once dry, take out the pins and shake the buns loose, scrunching hair lightly, while trying not to destroy the waviness.

7. This twisting hair method works best if you have a little texturizer in your hair before putting it into the buns. Saltwater is an excellent texturizer...I twist my hair after getting out of the ocean and it dries into lovely waves. If you don't live by the beach, you can try mixing sea salt with water and spritzing it onto your hair.

8. Another method for creating waves that some people have luck with is wrapping your damp hair on top of your head into a bun and securing with a scrunchy. Sleep with you hair like this and shake it loose in the morning. 

9. If you have lovely, naturally wavy hair, you may try applying some frizz easing products to provide a silky sheen and set your waves. Super curly-haired people may want to try a curl relaxing product to loosen up the curls into tousled waves. Whatever your hair type, try wavy for a day and you will instantly feel more girly, sexy and carefree!
  • Tips & Warnings


  • It is best not to brush your hair after you have created the waves or they will lose their structure.
  • Some people like to substitute the curling iron method with a hair straightener instead.
  • If using the "twisting method", after removing your buns, flip your head upside down and tousle your roots with your finger tips to lift hair and give it some volume.

PORES: How to Minimize Pores

LARGE PORES


Celebrities and models always look so gorgeously pore-less in the photos staring out at us from their magazine covers. They have pores just like the rest of us. Having pores is a non-negotiable part of having skin. In fact, we need to have them because they are essential to skin function.
Large pore size can be frustrating because it can interfere with an otherwise smooth quality to skin, and generally speaking, a large pore size is visually unappealing.


Why do we have large pores?

Your pore size is partly a matter of genetics and partly due to whatever is currently trapped inside of them. If you have a lot of oil or dead skin cells accumulating in your pores, that can stretch them out and make them look bigger.


And with most skin-related problems, the appearance of your pores can get worse due to sun exposure and aging. Both have a negative impact on collagen and elastin—the two components of your skin’s structural support system.

Exposure to ultra-violet rays creates molecules called free radicals that destroy your existing collagen and elastin. And one of the natural effects of getting older is that production of new collagen slows down. The combined effect means that what’s being damaged daily by sun exposure isn’t being repaired and rebuilt quickly enough.  When you lose support around your pores—because of a loss of collagen and elastin—they start to sag and look larger.


How can we minimize large pores?

As pore size is usually genetic, and there is not much you can do to make them permanently smaller. Do not fall for claims stating a product will reduce your pore size. However, there are some tips and tricks you can employ to temporarily minimize the appearance of pore size.

Here are the tips to minimize your pores:


1. Keep Your Skin Clean
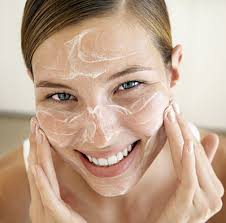


Exfoliate once a week to clean clogged pores. It is easier if you use facial steamer first then exfoliate gently. Clean pores look smaller.
You can use face washes, cleansers and masks which contain salicylic acid. It works to minimize pores by keeping them clear. It penetrates pores and helps to dissolve and dislodge oil, dirt and dead cells.


2.Use toner


Using a toner, or an astringent, after cleansing your face (before moisturizing) can help reduce the appearance of large pore size. Astringents constrict pores as well as help remove that last bit of oil and dirt. 


3.Use sunscreen daily


It is one of the few things you can do to help keep the skin's support structure strong and pores minimized. Look for a daily moisturizer that contains a broad-spectrum sunscreen and an SPF of 30 or higher. 


4.Use retinoid
 
Pore-Minimizing Secrets


Whether it is an over-the-counter retinol or a prescription-strength Retin-A, the active ingredient helps stimulate new collagen production in the skin. More collagen means better skin structure, and that means pores don’t sag and look larger.


5.A Little Makeup Help


Start with a primer to help smooth out the appearance of the skin and fill in pores so that foundation goes on flawlessly. Mineral powder foundations can give an airbrushing effect to the skin. For the most pore-minimizing coverage, apply it with a dry makeup sponge, pressing the powder firmly into the skin, and then buff off any excess with a large powder brush.


*****Follow this skin care regimen carefully if you are self conscious about your pores. You will observe your pores get cleaner and smaller, and your skin look much healthier.***** 


Related Posts Plugin for WordPress, Blogger...